
分布式锁
yudao-spring-boot-starter-protection (opens new window) 技术组件,使用 Redis 实现分布式锁的功能,它有 2 种使用方式:
- 编程式锁:基于 Redisson (opens new window)框架提供的各种 (opens new window)分布式锁
- 声明式锁:基于 Lock4j (opens new window)框架的
@Lock4j注解
Redis 分布式锁的实现原理?
参见 《Redis 实现原理与源码解析系列》 (opens new window)文章。
#1. 编程式锁
1 | <dependency> |
#1.1 Redisson 配置
无需配置。因为在 Redis 缓存 中,进行了 Spring Data Redis + Redisson 的配置。
#1.2 实战案例
yudao-module-pay 模块的 notify (opens new window)功能,使用到分布式锁,确保每个支付通知任务有且仅有一个在执行。下面,来看看这个案例是如何实现的。
友情提示:
建议你已经阅读过 《开发指南 —— Redis 缓存》 文档。
① 在 RedisKeyConstants (opens new window)类中,定义通知任务使用的分布式锁的 Redis Key。如下图所示:

② 创建 PayNotifyLockRedisDAO (opens new window)类,使用 RedisClient 实现分布式锁的加锁与解锁。如下图所示:

③ 在 PayNotifyServiceImpl (opens new window)执行指定的支付通知任务时,通过 PayNotifyLockRedisDAO 获得分布式锁。如下图所示:

技术选型:为什么不使用 Lock4j 提供的 LockTemplate 实现编程式锁?
两者各有优势,选择 Redisson 主要考虑它支持的 Redis 分布式锁的类型较多:可靠性较高的红锁、性能较好的读写锁等等。
Lock4j 的 LockTemplate 也是不错的选择,一方面不强依赖 Redisson 框架,一方面支持 ZooKeeper 等等。
#2. 声明式锁
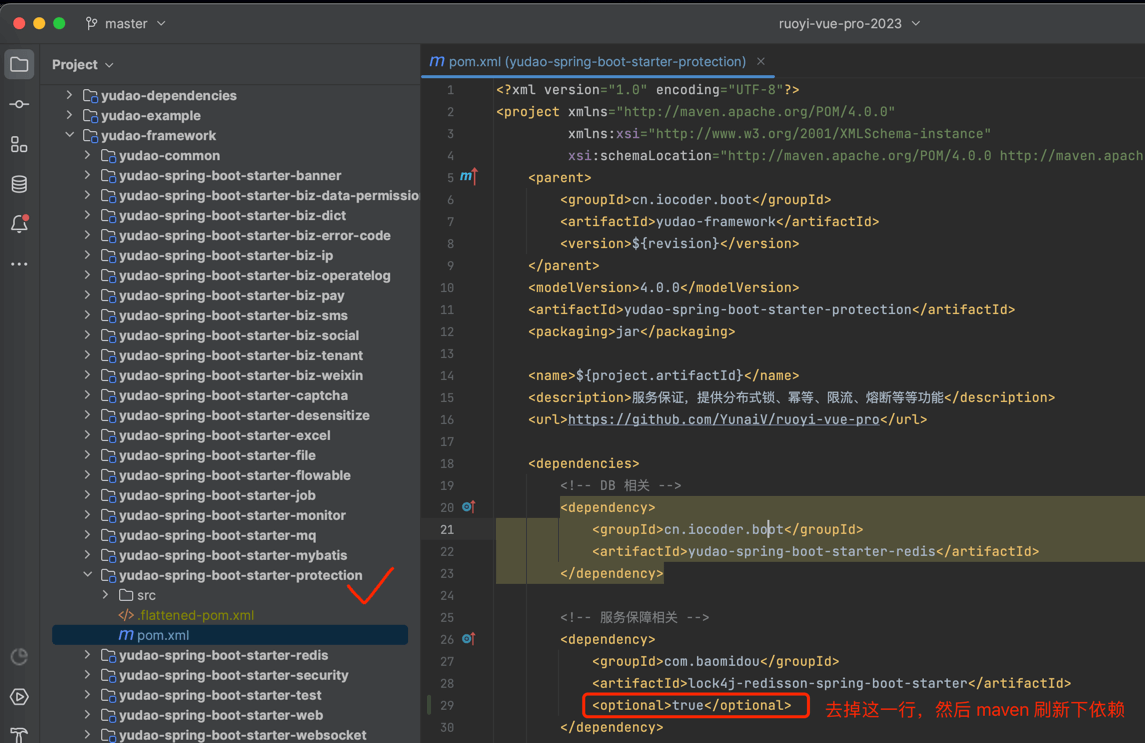
考虑到不是所有人都会使用 Lock4j 组件,所以默认项目未引入 lock4j-redisson-spring-boot-starter。如果你想要实用,可按照下图进行引入:
#2.1 Lock4j 配置
在 application-local.yaml (opens new window)配置文件中,通过 lock4j 配置项,添加 Lock4j 全局默认的分布式锁配置。如下图所示:

#2.2 使用案例
在需要使用到分布式锁的方法上,添加 @Lock4j 注解,非常方便。示例代码如下:
1 | @Service |